Sunday, February 20, 2011

My First Eggs Benedict!

I'm a HUGE fan of brunch, but there are some weekends I just can't get to it. So this morning I decided to make my own brunch. Only recently have a discovered the deliciousness that is hollandaise sauce, so I thought it was time for me to learn how to make it for myself.

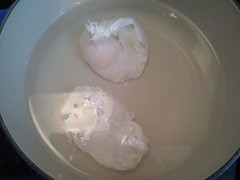
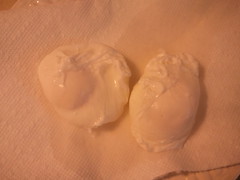
The first thing I needed to do was learn how to poach an egg. I always prepare my eggs scrambled, over-medium or as an omelette. It's about time I learned what a poached egg is all about.

I used THIS video and found its technique really easy!

Definitely follow it closely, with the separate bowl, white vinegar in the simmering water and I used a pot with a lid. Everything worked perfectly. The eggs didn't even need to be touched once I put them into the water.

Poaching Eggs

I wanted to make sure the white of the eggs were fully cooked, so I let them simmer for exactly 3 minutes. I had everything prepared a head of time so I could take the eggs out and pat the water off with a paper towel.

Poached eggs after 3 minutes
Above are the poached eggs after 3 minutes.


Poached eggs drying

Here are my delicious jewels drying on some paper towel.

I had already prepared the hollandaise sauce, which I did while my sausage was cooking and my water was heating up. I wanted to make sure everything was nice and hot when I was ready to pour the sauce over everything.

I used THIS recipe for the hollandaise sauce and it came out really well! I used Smart Balance instead of butter, since I don't usually buy butter. It cooked up just fine and it tasted really good regardless of the substitution. I actually halved the recipe since I was only cooking for one. So I just used one egg yolk (I saved the egg white for tomorrow's breakfast), half tablespoon of lemon juice, half tablespoon of warm water, a dash of salt and cayenne pepper and a dash of Worcestershire sauce. Many of the recipes for hollandaise called for Worcestershire sauce, so I figured it was important. Once the sauce was made, I began setting up my dish while my eggs were cooking.


Spinach Pancakes

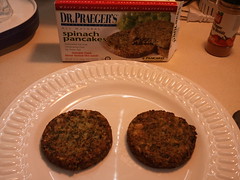
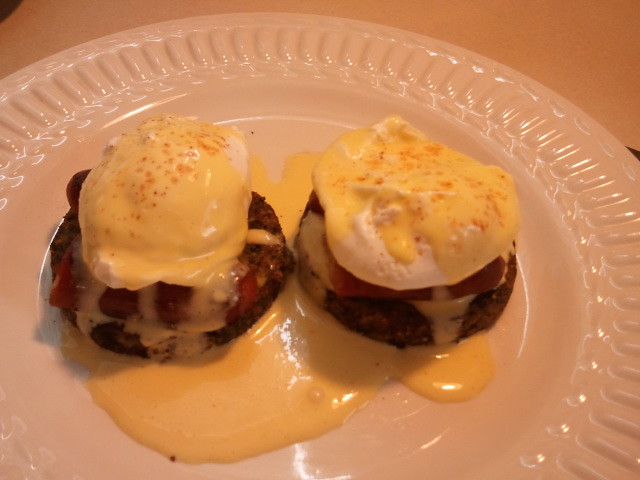
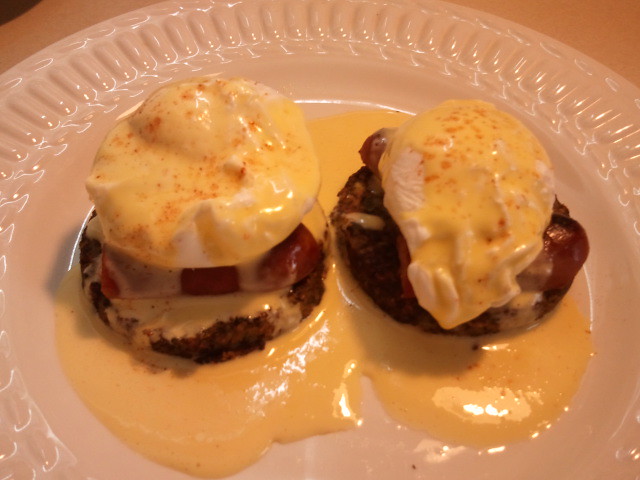
To set up my eggs benedict, I used spinach pancakes, which I bought at a health food store. They looked really good, and figured they might be tastier than a regular english muffin. I cooked these in the oven at 425 degrees for 12 minutes.

Chicken Apple Sausage

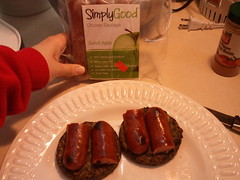
Meanwhile I needed a little protein, so I went with chicken and apple sausage by Simply Good. I really liked these sausages since they have less sodium and are far healthier than their competitors. I grilled these on my cast iron griddle.

Putting together my eggs benedict

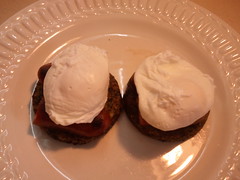
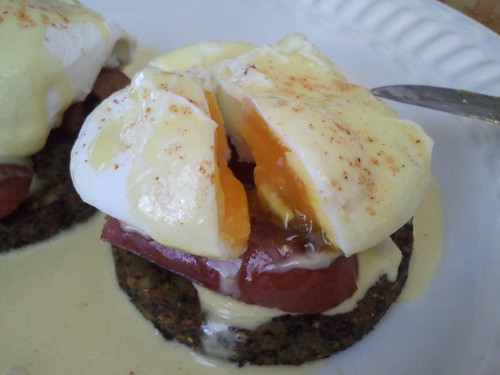
After patting the eggs dry, I placed them on top and was ready to pour the freshly made hollandaise sauce.

Here's the final product:

Jaci's Eggs Benedict

Here's from another angle.


Jaci's Eggs Benedict

I thought the eggs were cooked perfectly. I would rather have less runny yolk but fully cooked egg whites. So I was really pleased with the result.


A little well done

It was really a DELICIOUS dish. It was by far the most delicious breakfast I've ever made. I wished I could have shared it with someone. I'll be sure to make this the next time I have guests over for brunch. I would have easily paid $15 for this in a restaurant. It just goes to show that with a little patience, you can make tasty food in your own kitchen.


Perfectly cooked poached eggs

In the end, I licked the plate clean! It was just the right amount of hollandaise sauce, the eggs were easy to cook and everything tasted amazing. I'll be sure to experiment with different types of breakfast meats, veggies, and the starch base.

Tuesday, February 8, 2011

My First Dairy-Free Ravioli!

Every day I have the same reaction as I'm finishing up my meal - "Oh crap, I forgot to take photographs for my blog!" Yup, every single day I do this. I'm still getting used to the idea of blogging, but will try much harder next time.


Last night, in return for a gorgeous haircut, I made my sister Mel a ravioli feast. My fabulous neighbor and blogging guru BitchCakes introduced me to the frozen dairy-free ravioli at our local organic supermarket, The Garden, and I couldn't wait to try some.


I tried the Soy Boy Verde Ravioli (Garden Herb and Tofu Filling) and a Vegan Artichoke Ravioli, which I believe is made by Cafferata but I can't exactly remember. I'll find out next time I go to the supermarket. They had a lot of different options and will certainly try them all!


The ravioli were easy enough to cook by just adding to boiling water for 7 to 8 minutes, but I needed a sauce. So I decided to make something up and it came out pretty well.


All I did cook some onions and garlic in a splash of olive oil. After about 5 to 7 minutes, I added chopped plum tomatoes and diced leeks. Just this would have been fine as a lighter sauce, but I wanted something a little heartier. I added some no sodium added tomato paste to thicken the sauce up. Adding a little water here and there to make sure it didn't try out. I threw in some white pepper, salt, a tiny bit of sugar (secret ingredient for any tomato sauce) and some fresh chopped parsley.


Once the sauce was cooked down, I took about a cup of it and blended it with my hand-blender (my new best friend). Adding the puree, which would have been delicious on its own, back to the pan to mix with the chunkier sauce. I like my sauce chunky!

For a side side, I sauteed some spinach in olive oil to make sure I was getting enough rich greens in my diet. I was feeling naughty, since this meal on its own was so healthy, that I made garlic bread too. I know, I'm terrible. I just sauteed minced garlic in Smart Balance (I almost never have real butter in my kitchen), soaked up a little on some thinly sliced Italian bread and toasted in the oven. It came out delicious and it wasn't all that greasy since it was just a little bit of Smart Balance on each.


This entire meal probably took me 45 minutes from start to finish. Super easy - anyone can do it!!!


Below are the left overs I'm currently eating for lunch. The green ravioli are the Soy Boy Verde Ravioli and the GIANT one in the middle is the artichoke. I think the Soy Boy ones taste better, just so ya know. But I can't wait to try all the other flavors of dairy-free ravioli!

Thanks Bitchcakes for noticing these in the supermarket.


I will try much harder in the future to photograph while cooking and the final produce. My leftovers above don't do the food justice. They had to travel through 3 borough to get to this plate on 2 different trains. Needless to say they had a rough journey, but they sure did taste good.

Friday, February 4, 2011

Restaurant Week - Asia de Cuba

Since Adam (the bf) and I had such a nice time at Lure Fishbar for Restaurant Week, we wanted to get one more meal in before it was over.

Yesterday, we decided to enjoy a nice lunch at Asia de Cuba. They had very good reviews on Yelp and an interesting menu.

The place was pretty, but strange at the same time. Their decor consisted of white curtains along the walls, so it felt pretty stale to me. We were seated upstairs overlooking the downstairs, which centered around a giant light box with a waterfall-type image. It was pretty cheesy if you ask me, but I wasn't there for the decor, I was there to eat!


Adam at Asia de Cuba <--- Adam being silly while we wait for our food. :)

The service was rushed and uninviting, but it was lunch and fairly busy. A party of 2 consisted of 2 appetizers, 1 shared entree and 1 shared dessert. We were a little worried about the portion size, but in the end left full.


To start, the brought out the Beef Dumplings Two Ways, which were really tasty! The dish had three crispy beef dumplings that reminded me of fried wontons and steamed beef dumplings with ponzu sauce. There was something on the menu about coconut rice, but there was no rice to be found on our plate. Anyhoo, they were large, filled with beef and seasoned well. Definitely top-notch dumplings, but was terrified to discover they charge over $20 for this on the regular menu. They were by no means worth $20, even $1 per dumpling seems like a rip-off to me.

Asia de Cuba Beef Dumplings Two Ways


Next came the Lemongrass Skewered Chicken, which was my favorite dish at Asia de Cuba. I do believe that each skewer was a boneless, skinless chicken thigh, which is why I was melt-in-your-mouth good. The flavor was light, sweet with a hint of spice. It was truly a delicious appetizer and would have loved a side of veggies to eat as a whole meal.


Asia de Cuba Lemongrass Skewered Chicken


When our entree, the Sweet Soy Wild Salmon, was served, it was really dry. Considering Asia de Cuba is supposedly a top-notch restaurant (it better be for the price on their regular menu), we decided to complain and send it back.

I'm usually torn when it comes to sending back food. If the restaurant makes a mistake, I always send it back, which happens frequently when I request no cheese on certain dishes, especially salads. But I don't normally send back food if its cooked improperly - I usually deal with it. Adam worked in the food industry and the thought of someone being upset with me and tampering with my food isn't worth sending it back.

However, in this situation my thinking is that if you don't send it back, the kitchen thinks everything is fine, when in fact everything is not fine. Over-firing a piece of salmon is easy to fix and a good restaurant should not have sent out an overcooked piece of fish to begin with.

Our server, although a little out of it, was happy to get us a new dish and told us he'll put in the order for medium-rare. When it did come out about 10 minutes later, it looked great, but still wasn't all that good.

Asia de Cuba Sweet Soy Wild Salmon with Wild Mushrooms

The fish wasn't succulent. To me, salmon should be soft, sweet, easy to flake apart with my fork. It should melt in your mouth. This salmon, although slightly undercooked, was still tough and not that tasty. Perhaps they were giving us a shitty piece of fish because of Restaurant Week or because we complained. Regardless it was a very unremarkable dish with bland mushrooms. I wouldn't have paid $5 for this dish, seriously. I make killer salmon in comparison.

The dessert was all the rave in reviews, so we were very excited for this. It looked grand, but in fact was a little underwhelming like the fish. It was a huge portion and more than enough for 4 people to share. But I prefer quality over quantity any day.

It was coconut cake (like a spongecake) with chocolate sauce, a scoop of coconut ice-cream and some weird cream layered into the cake. It was good at moments if you got the right combination of cake to cream and chocolate sauce, but most of the time you were just eating dry coconut cake. We should have gone with the sorbet.


Asia de Cuba Coconut Invasion


Overall, Asia de Cuba sounds like a good idea, but all it really is is a lot of hype. It's in an expensive hotel in an expensive area catering to rich people who apparently don't know good food. If you look at the menu, most of their dishes are cheap foods spiced up with fancy sauce. Sure sauce is important, but I would rather have a good piece of fish with little seasoning than a crappy piece of fish dunked in glaze. They're obviously hiding their low quality food with sauces. There are SO many incredible restaurants in NYC and I'll be sure to try some where else before ever coming here again.

Asia de Cuba only get 2.5 stars in my book!


Tuesday, February 1, 2011

Bulgur Risotto with Shrimp

I felt like cooking something quick but healthy, so I did a little research on one of my favorite food sites, epicurious, and discovered that you could actually make a risotto with wheat bulgur!

Bulgur is a recent discovery of mine and I'm still figuring out some interesting ways to prepare it. Over the summer I tried a great recipe with nectarines, pistachios and dill with a balsamic vinaigrette, which was awesome but not really a winter dish since its served chilled.

I love risotto but most recipes call for dairy and cheese - not okay in my book (or my belly). If I haven't mentioned it before, I'm allergic to dairy. Yes, that's allergic not lactose intolerant. I
break out in hives if I have too much dairy and cheese actually makes my throat close-up. My mother is deathly allergic to cheese in even the smallest quantities, so I'm assuming she passed on this lovely allergy on to me. But it doesn't bother me - I grew up without eating cheese and miss it very little. I really only like mozzarella and will once in a while have a slice of pizza and suffer the consequences (which are well worth the deliciousness that is pizza!)

Back to the bulgur!

So the recipe is pretty simple and it came out great.

All you need is:
  • Shrimp (I used raw, frozen with the shells still on)
  • 1 cup of wheat bulgur
  • 1 lime, juiced
  • 3 large cloves of garlic, minced
  • 2 cups of corn (I used frozen since it was easier)
  • 1 red pepper, diced
  • 1/4 teaspoon of red pepper flakes
  • 1/2 tablespoon of salt
Step 1:
Get some water boiling in a tea kettle or an easy to pour sauce pan. You will want about 3 cups that are nice and hot to cook your bulgur.

Saute the minced garlic in about 2 tablespoons of olive oil for about a minute or two, do not let it brown.

Step 2:
Add the wheat bulgur, the salt and mix it around for a minute or two. You want the bulgur to soak up all the delicious garlic infused oil. Then add about a cup of the pipping hot water that you boiled ahead of time. Aren't you glad you did that... now your bulgur will be at a boil. Let this simmer for a few minutes, add another cup so that it's soupy. Your bulgur will eventually soak up all the water, expand and become creamy once you cook everything.


Step 3:
After waiting about 10 minutes, put your shrimp in and give it a nice stir. Regardless if your shrimp are thawed or not, just wait till they start to turn pink, then throw your veggies in. Shrimp cook up super fast, so pay attention. I think shrimp with the skins on make for a tastier dish, which is why I didn't peel them before hand.


Step 4:
Once the shrimp start turning pink, throw in the corn, pepper, lime juice and pepper flakes. Give everything a good stir. Add some more water if things are getting a bit dry. Bulgur eats up a lot of water and there's always evaporation. I probably added about 3 cups in total over the course of cooking.

Once everything is nice and cooked, which took about 5 - 7 minutes on the lowest heat setting on my stove, its ready to serve! Wasn't that easy and fast!!

The dish was really tasty and it wasn't that difficult to eat even though you need to peel the shrimp. I was surprised by how much flavor it packed even though it was only a little olive oil, lime, some veggies and shrimp. It also came out a little creamy after everything cooked down. I'm definitely making this again and will try it with different veggies!

Remember wheat bulgur has more protein and fiber than white rice, so eat up!